Redirect
Using our Prebuilt or you can call it the redirect Integration is the fastest way to go live
As we are going to handle the payment process instead of you.
Before start
- Make sure to follow the steps here
- It will show you how to set up your account and get the
merchat_keyand thepassword.
Checkout process
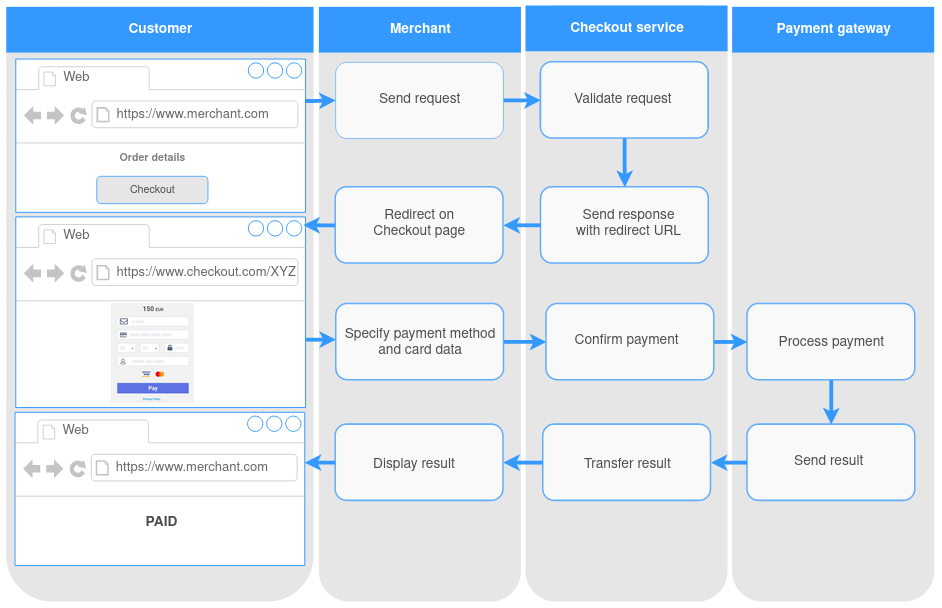
Make an Authentication request
Authentication request is the main request by making this request you will receive the redirect url that you will redirecdt your customer to to continue the payment process . Once you are ready to create a transaction
- Create an Authentication object as json
- send a
POSTreqeust tohttps://checkout.dineropay.com/api/v1/session- In the response get the
redirect_url- Redirect the customer to the checkout page
- once the customer finish the payment process he will be redirected to
success_urlupon success orcancel_urlupon failure payments.- Receive the response via
callback_notificationto update the transaction status .
The list of the fields that will be dipslayed on the Checkout page depends on the request parameters and the specified payment method. For more details check the section below.
sample purchase reqeust
{
    "merchant_key": "1d903ea0-e8dc-11ed-bbba-d60e6b1bd8d8",
    "operation": "purchase",
    "methods": ["card"],
    "order": {
        "number": "order-1234",
        "amount": "1.00",
        "currency": "SAR",
        "description": "gift"
    },
    "cancel_url": "https://example.com/cancel",
    "success_url": "https://example.com/success",
    "hash": "416830ec3be6ac7c6ca539a4e9dbdd5c8971097d"
}
The above request only contain the mandatory parameters for more info go here
Always make the API request from your server side to follow best practices
Fields on the checkout page
In the checkout page there will be some fields based on the acquirer requirements
however your customer will not see fields that the bank dose not need
For example, if an alternative payment method is specified such as stcpay, the card data is not displayed on the Checkout page.
As well, pay attention to the conditional fields such as e-mail or billing address. If the e-mail and billing address (data object) parameters are specified in the request, the Checkout page will not contain them.
Additional fields can also be displayed if a payment method is selected that requests additional data from the Customer.
The Checkout page has the fields validation. In case of the invalid data the error message will be shown and the field will be highlighted.
General fields and possible errors
| Fields | Type | Limiation | Error | Display |
|---|---|---|---|---|
| Card number | Int | Lun algorithm, length 14-19 numbers | Invalid card number | Displayed in the checkout page |
| Expiry date | Date | 2-2 numbers (in the format mm-yy),after today's date | The expiration date of card is expiredand not valid. | Displayed in the checkout page |
| Security code | Int | Up to 4 characters | Invalid security code | Displayed in the checkout page |
| Name on the card | String | Up to 22 characters (min - 2 characters) | The name on card field must have at least 2 characters. | It will take customer name if it's exist in request body |
| Country | List | 2-letters code | Country is required Please enter a valid Country | It will take the Country passed on the billing address object if it's exist |
| State/Region | String | It will take the State passed on the billing address object if it's exist | ||
| City | String | Up to 32 characters | City is required . Please enter a valid city | It will take the City passed on the billing address object if it's exist |
| Address line | String | Up to 32 characters | Address line is required | It will take the address passed on the billing address object if it's exist |
| Zip code | String | Up to 32 characters | Zip code is required. Please enter a valid Zip code | It will take the zip code passed on the billing address object if it's exist |
| Phone number | String | Up to 32 characters | Phone number is required. Please enter a valid Phone number | It will take the phone number passed on the billing address object if it's exist |
As we stated above the fields shown in the checkout page will depand on the payment method , and the data sent in the request body
you can decide what fields need to be shown by refereing to the table above and send in the request body the fields that you don't want it to be shown to the customer .
Hosted page Customization
We give you the option to customaize the payment page with the preferences of the merchant . The action is available for the authorized users only.
To customize the payment page you need:
- From the dashboard click the “Configuration → Branding” item on the menu bar. The settings are displayed in the work area.
- Select a page template to make changes.
- Change the settings:
- login icon selection
- color selection for:
- heading
- background
- buttons
- Click the “Submit” button to apply the settings. The selected settings will be displayed to the Customers on the Checkout page.